Android Retrofit Call Again on Failed

Kriptofolio app serial — Function 5
These days nigh every Android app connects to internet to get/send data. Y'all should definitely acquire how to handle RESTful Web Services, as their correct implementation is the core noesis while creating modern apps.
This part is going to be complicated. We are going to combine multiple libraries at once to get a working effect. I am not going to talk most the native Android way to handle internet requests, considering in the real globe nobody uses it. Every adept app does not try to reinvent the wheel just instead uses the most popular third party libraries to solve common problems. It would exist as well complicated to recreate the functionality that these well-fabricated libraries have to offering.
Serial content
- Introduction: A roadmap to build a modern Android app in 2018–2019
- Part i: An introduction to the SOLID principles
- Role 2: How to start building your Android app: creating Mockups, UI, and XML layouts
- Part 3: All virtually that Architecture: exploring different architecture patterns and how to utilize them in your app
- Part 4: How to implement Dependency Injection in your app with Dagger ii
- Part v: Handle RESTful Web Services using Retrofit, OkHttp, Gson, Glide and Coroutines (you're here)
What is Retrofit, OkHttp and Gson?
Retrofit is a Balance Client for Java and Android. This library, in my stance, is the about important one to learn, every bit it volition do the main chore. It makes it relatively easy to retrieve and upload JSON (or other structured data) via a Residuum based webservice.
In Retrofit yous configure which converter is used for the data serialization. Typically to serialize and deserialize objects to and from JSON you use an open-source Java library — Gson. Also if you need, you can add custom converters to Retrofit to process XML or other protocols.
For making HTTP requests Retrofit uses the OkHttp library. OkHttp is a pure HTTP/SPDY client responsible for any low-level network operations, caching, requests and responses manipulation. In dissimilarity, Retrofit is a high-level Rest abstraction build on meridian of OkHttp. Retrofit is strongly coupled with OkHttp and makes intensive utilise of information technology.
At present that you know that everything is closely related, nosotros are going to use all these 3 libraries at one time. Our first goal is to go all the cryptocurrencies list using Retrofit from the Internet. We will use a special OkHttp interceptor class for CoinMarketCap API hallmark when making a call to the server. We will become back a JSON data consequence and then catechumen it using the Gson library.
Quick setup for Retrofit 2 just to try it first
When learning something new, I similar to try it out in practice as shortly as I tin. We will utilize a similar approach with Retrofit 2 for you lot to sympathise it better more quickly. Don't worry right now about lawmaking quality or any programming principles or optimizations — nosotros'll just write some code to make Retrofit 2 work in our project and hash out what it does.
Follow these steps to ready Retrofit 2 on My Crypto Coins app project:
First, requite Cyberspace permission for the app
We are going to execute HTTP requests on a server accessible via the Internet. Requite this permission by adding these lines to your Manifest file:
<manifest xmlns:android="http://schemas.android.com/apk/res/android" package="com.baruckis.mycryptocoins"> <uses-permission android:name="android.permission.Net" /> ... </manifest> Then you should add library dependencies
Notice the latest Retrofit version. As well you should know that Retrofit doesn't ship with an integrated JSON converter. Since we will become responses in JSON format, we need to include the converter manually in the dependencies too. We are going to utilize latest Google's JSON converter Gson version. Let's add these lines to your gradle file:
// third political party // HTTP client - Retrofit with OkHttp implementation "com.squareup.retrofit2:retrofit:$versions.retrofit" // JSON converter Gson for JSON to Coffee object mapping implementation "com.squareup.retrofit2:converter-gson:$versions.retrofit" As y'all noticed from my comment, the OkHttp dependency is already shipped with the Retrofit 2 dependency. Versions is just a separate gradle file for convenience:
def versions = [:] versions.retrofit = "2.4.0" ext.versions = versions Next fix the Retrofit interface
It's an interface that declares our requests and their types. Hither nosotros define the API on the customer side.
/** * REST API access points. */ interface ApiService { // The @Become annotation tells retrofit that this asking is a get type request. // The cord value tells retrofit that the path of this request is // baseUrl + v1/cryptocurrency/listings/latest + query parameter. @GET("v1/cryptocurrency/listings/latest") // Annotation @Query is used to ascertain query parameter for request. Finally the request url will // expect like that https://sandbox-api.coinmarketcap.com/v1/cryptocurrency/listings/latest?catechumen=EUR. fun getAllCryptocurrencies(@Query("convert") currency: Cord): Call<CryptocurrenciesLatest> // The return blazon for this function is Telephone call with its type CryptocurrenciesLatest. } And fix the data class
Data classes are POJOs (Patently Erstwhile Java Objects) that correspond the responses of the API calls we're going to make.
/** * Data class to handle the response from the server. */ information grade CryptocurrenciesLatest( val status: Condition, val information: List<Information> ) { data grade Data( val id: Int, val proper noun: Cord, val symbol: String, val slug: Cord, // The annotation to a model property lets you pass the serialized and deserialized // proper noun as a string. This is useful if y'all don't desire your model class and the JSON // to have identical naming. @SerializedName("circulating_supply") val circulatingSupply: Double, @SerializedName("total_supply") val totalSupply: Double, @SerializedName("max_supply") val maxSupply: Double, @SerializedName("date_added") val dateAdded: String, @SerializedName("num_market_pairs") val numMarketPairs: Int, @SerializedName("cmc_rank") val cmcRank: Int, @SerializedName("last_updated") val lastUpdated: String, val quote: Quote ) { data class Quote( // For boosted pick during deserialization you tin specify value or alternative // values. Gson will check the JSON for all names we specify and try to find 1 to // map information technology to the annotated property. @SerializedName(value = "USD", alternating = ["AUD", "BRL", "CAD", "CHF", "CLP", "CNY", "CZK", "DKK", "EUR", "GBP", "HKD", "HUF", "IDR", "ILS", "INR", "JPY", "KRW", "MXN", "MYR", "NOK", "NZD", "PHP", "PKR", "PLN", "RUB", "SEK", "SGD", "THB", "Endeavor", "TWD", "ZAR"]) val currency: Currency ) { data class Currency( val toll: Double, @SerializedName("volume_24h") val volume24h: Double, @SerializedName("percent_change_1h") val percentChange1h: Double, @SerializedName("percent_change_24h") val percentChange24h: Double, @SerializedName("percent_change_7d") val percentChange7d: Double, @SerializedName("market_cap") val marketCap: Double, @SerializedName("last_updated") val lastUpdated: String ) } } data grade Condition( val timestamp: String, @SerializedName("error_code") val errorCode: Int, @SerializedName("error_message") val errorMessage: String, val elapsed: Int, @SerializedName("credit_count") val creditCount: Int ) } Create a special interceptor class for hallmark when making a call to the server
This is the case particular for any API that requires hallmark to get a successful response. Interceptors are a powerful way to customize your requests. Nosotros are going to intercept the actual request and to add individual asking headers, which volition validate the phone call with an API Key provided past CoinMarketCap Professional API Developer Portal. To get yours, you need to register there.
/** * Interceptor used to intercept the actual asking and * to supply your API Key in REST API calls via a custom header. */ class AuthenticationInterceptor : Interceptor { override fun intercept(concatenation: Interceptor.Concatenation): Response { val newRequest = chain.request().newBuilder() // TODO: Use your API Key provided by CoinMarketCap Professional person API Developer Portal. .addHeader("X-CMC_PRO_API_KEY", "CMC_PRO_API_KEY") .build() return concatenation.go along(newRequest) } } Finally, add together this code to our activity to encounter Retrofit working
I wanted to get your hands dirty as soon as possible, then I put everything in i identify. This is not the right way, but information technology's the fastest instead simply to encounter a visual upshot apace.
form AddSearchActivity : AppCompatActivity(), Injectable { private lateinit var listView: ListView private lateinit var listAdapter: AddSearchListAdapter ... override fun onCreate(savedInstanceState: Bundle?) { super.onCreate(savedInstanceState) ... // Later we will setup Retrofit correctly, but for now we do all in one place just for quick start. setupRetrofitTemporarily() } ... private fun setupRetrofitTemporarily() { // We need to fix a custom OkHttp client because need to apply our custom phone call interceptor. // to exist able to authenticate our requests. val builder = OkHttpClient.Builder() // Nosotros add the interceptor to OkHttpClient. // Information technology will add authentication headers to every phone call we brand. builder.interceptors().add together(AuthenticationInterceptor()) val client = builder.build() val api = Retrofit.Builder() // Create retrofit builder. .baseUrl("https://sandbox-api.coinmarketcap.com/") // Base url for the api has to end with a slash. .addConverterFactory(GsonConverterFactory.create()) // Use GSON converter for JSON to POJO object mapping. .client(customer) // Here we set the custom OkHttp client we just created. .build().create(ApiService::grade.java) // We create an API using the interface nosotros divers. val adapterData: MutableList<Cryptocurrency> = ArrayList<Cryptocurrency>() val currentFiatCurrencyCode = "EUR" // Let's make asynchronous network asking to get all latest cryptocurrencies from the server. // For query parameter we pass "EUR" as nosotros desire to get prices in euros. val call = api.getAllCryptocurrencies("EUR") val result = call.enqueue(object : Callback<CryptocurrenciesLatest> { // Yous will ever go a response even if something wrong went from the server. override fun onFailure(call: Call<CryptocurrenciesLatest>, t: Throwable) { Snackbar.make(findViewById(android.R.id.content), // Throwable will allow usa discover the mistake if the call failed. "Telephone call failed! " + t.localizedMessage, Snackbar.LENGTH_INDEFINITE).prove() } override fun onResponse(call: Phone call<CryptocurrenciesLatest>, response: Response<CryptocurrenciesLatest>) { // Check if the response is successful, which means the request was successfully // received, understood, accustomed and returned code in range [200..300). if (response.isSuccessful) { // If everything is OK, let the user know that. Toast.makeText(this@AddSearchActivity, "Call OK.", Toast.LENGTH_LONG).show(); // Than quickly map server response data to the ListView adapter. val cryptocurrenciesLatest: CryptocurrenciesLatest? = response.torso() cryptocurrenciesLatest!!.information.forEach { val cryptocurrency = Cryptocurrency(it.name, it.cmcRank.toShort(), 0.0, information technology.symbol, currentFiatCurrencyCode, it.quote.currency.price, 0.0, it.quote.currency.percentChange1h, it.quote.currency.percentChange7d, it.quote.currency.percentChange24h, 0.0) adapterData.add together(cryptocurrency) } listView.visibility = View.VISIBLE listAdapter.setData(adapterData) } // Else if the response is unsuccessful information technology will exist defined by some special HTTP // error code, which we can prove for the user. else Snackbar.brand(findViewById(android.R.id.content), "Call error with HTTP condition lawmaking " + response.code() + "!", Snackbar.LENGTH_INDEFINITE).bear witness() } }) } ... } You can explore the code hither. Think this is only an initial simplified implementation version for you to get the idea better.
Concluding correct setup for Retrofit 2 with OkHttp 3 and Gson
Ok after a quick experiment, it is fourth dimension to bring this Retrofit implementation to the side by side level. We already got the information successfully just non correctly. We are missing the states like loading, error and success. Our code is mixed without separation of concerns. It's a mutual mistake to write all your code in an action or a fragment. Our activity class is UI based and should only incorporate logic that handles UI and operating system interactions.
Actually, afterwards this quick setup, I worked a lot and fabricated many changes. There is no point to put all the lawmaking that was changed in the article. Better instead y'all should browse the final Part v code repo here. I accept commented everything very well and my lawmaking should be clear for y'all to empathise. But I am going to talk nearly most important things I have done and why I did them.
The first footstep to improve was to commencement using Dependency Injection. Recall from the previous part nosotros already have Dagger 2 implemented within the project correctly. So I used it for the Retrofit setup.
/** * AppModule will provide app-wide dependencies for a function of the application. * Information technology should initialize objects used across our application, such as Room database, Retrofit, Shared Preference, etc. */ @Module(includes = [ViewModelsModule::grade]) course AppModule() { ... @Provides @Singleton fun provideHttpClient(): OkHttpClient { // Nosotros demand to set a custom OkHttp client because need to use our custom call interceptor. // to be able to authenticate our requests. val architect = OkHttpClient.Architect() // We add together the interceptor to OkHttpClient. // It will add hallmark headers to every call we make. architect.interceptors().add(AuthenticationInterceptor()) // Configure this client non to retry when a connectivity problem is encountered. builder.retryOnConnectionFailure(imitation) // Log requests and responses. // Add logging as the last interceptor, because this will also log the information which // you added or manipulated with previous interceptors to your request. architect.interceptors().add together(HttpLoggingInterceptor().apply { // For product environment to enhance apps performance we will be skipping any // logging functioning. We will show logs just for debug builds. level = if (BuildConfig.DEBUG) HttpLoggingInterceptor.Level.BODY else HttpLoggingInterceptor.Level.NONE }) return builder.build() } @Provides @Singleton fun provideApiService(httpClient: OkHttpClient): ApiService { render Retrofit.Builder() // Create retrofit builder. .baseUrl(API_SERVICE_BASE_URL) // Base of operations url for the api has to end with a slash. .addConverterFactory(GsonConverterFactory.create()) // Utilise GSON converter for JSON to POJO object mapping. .addCallAdapterFactory(LiveDataCallAdapterFactory()) .customer(httpClient) // Here we set the custom OkHttp customer we only created. .build().create(ApiService::class.java) // We create an API using the interface we defined. } ... } Now as you see, Retrofit is separated from the activity class as it should be. It will be initialized only once and used app-wide.
As y'all may have noticed while creating the Retrofit builder instance, we added a special Retrofit calls adapter using addCallAdapterFactory. By default, Retrofit returns a Call<T>, only for our projection we require it to return a LiveData<T> type. In lodge to exercise that we demand to add LiveDataCallAdapter by using LiveDataCallAdapterFactory.
/** * A Retrofit adapter that converts the Call into a LiveData of ApiResponse. * @param <R> </R> */ class LiveDataCallAdapter<R>(individual val responseType: Type) : CallAdapter<R, LiveData<ApiResponse<R>>> { override fun responseType() = responseType override fun accommodate(telephone call: Call<R>): LiveData<ApiResponse<R>> { return object : LiveData<ApiResponse<R>>() { individual var started = AtomicBoolean(false) override fun onActive() { super.onActive() if (started.compareAndSet(false, true)) { call.enqueue(object : Callback<R> { override fun onResponse(call: Call<R>, response: Response<R>) { postValue(ApiResponse.create(response)) } override fun onFailure(phone call: Call<R>, throwable: Throwable) { postValue(ApiResponse.create(throwable)) } }) } } } } } class LiveDataCallAdapterFactory : CallAdapter.Manufactory() { override fun get( returnType: Blazon, annotations: Array<Annotation>, retrofit: Retrofit ): CallAdapter<*, *>? { if (CallAdapter.Factory.getRawType(returnType) != LiveData::grade.java) { return null } val observableType = CallAdapter.Manufacturing plant.getParameterUpperBound(0, returnType equally ParameterizedType) val rawObservableType = CallAdapter.Factory.getRawType(observableType) if (rawObservableType != ApiResponse::class.java) { throw IllegalArgumentException("type must exist a resource") } if (observableType !is ParameterizedType) { throw IllegalArgumentException("resource must exist parameterized") } val bodyType = CallAdapter.Manufactory.getParameterUpperBound(0, observableType) return LiveDataCallAdapter<Any>(bodyType) } } Now nosotros will get LiveData<T> instead of Call<T> as the return type from Retrofit service methods divers in the ApiService interface.
Another important step to make is to showtime using the Repository pattern. I have talked about information technology in Part three. Check out our MVVM architecture schema from that postal service to remember where information technology goes.
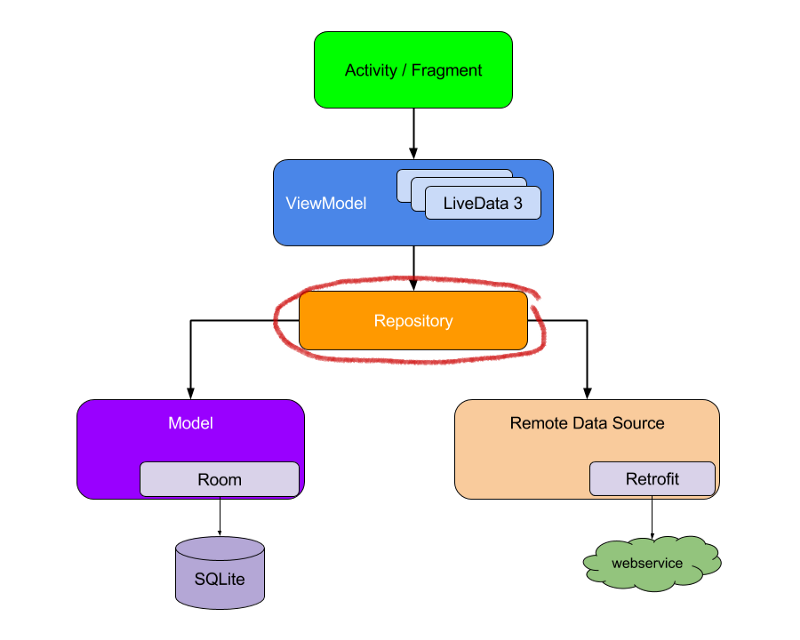
As you run into in the picture, Repository is a separate layer for the data. Information technology'southward our single source of contact for getting or sending data. When nosotros employ Repository, we are following the separation of concerns principle. We tin can have different information sources (like in our instance persistent data from an SQLite database and data from web services), only Repository is always going to be unmarried source of truth for all app data.
Instead of communicating with our Retrofit implementation directly, nosotros are going to use Repository for that. For each kind of entity, nosotros are going to have a separate Repository.
/** * The grade for managing multiple data sources. */ @Singleton form CryptocurrencyRepository @Inject constructor( private val context: Context, private val appExecutors: AppExecutors, private val myCryptocurrencyDao: MyCryptocurrencyDao, private val cryptocurrencyDao: CryptocurrencyDao, private val api: ApiService, private val sharedPreferences: SharedPreferences ) { // Just a simple helper variable to store selected fiat currency code during app lifecycle. // It is needed for main screen currency spinner. We set it to exist same as in shared preferences. var selectedFiatCurrencyCode: String = getCurrentFiatCurrencyCode() ... // The Resource wrapping of LiveData is useful to update the UI based upon the state. fun getAllCryptocurrencyLiveDataResourceList(fiatCurrencyCode: String, shouldFetch: Boolean = fake, callDelay: Long = 0): LiveData<Resource<List<Cryptocurrency>>> { return object : NetworkBoundResource<List<Cryptocurrency>, CoinMarketCap<List<CryptocurrencyLatest>>>(appExecutors) { // Hither we save the data fetched from spider web-service. override fun saveCallResult(detail: CoinMarketCap<List<CryptocurrencyLatest>>) { val list = getCryptocurrencyListFromResponse(fiatCurrencyCode, particular.data, item.condition?.timestamp) cryptocurrencyDao.reloadCryptocurrencyList(listing) myCryptocurrencyDao.reloadMyCryptocurrencyList(listing) } // Returns boolean indicating if to fetch data from web or not, true means fetch the information from web. override fun shouldFetch(data: List<Cryptocurrency>?): Boolean { render data == null || shouldFetch } override fun fetchDelayMillis(): Long { return callDelay } // Contains the logic to get data from the Room database. override fun loadFromDb(): LiveData<Listing<Cryptocurrency>> { return Transformations.switchMap(cryptocurrencyDao.getAllCryptocurrencyLiveDataList()) { data -> if (data.isEmpty()) { AbsentLiveData.create() } else { cryptocurrencyDao.getAllCryptocurrencyLiveDataList() } } } // Contains the logic to become data from web-service using Retrofit. override fun createCall(): LiveData<ApiResponse<CoinMarketCap<List<CryptocurrencyLatest>>>> = api.getAllCryptocurrencies(fiatCurrencyCode) }.asLiveData() } ... fun getCurrentFiatCurrencyCode(): String { return sharedPreferences.getString(context.resources.getString(R.string.pref_fiat_currency_key), context.resources.getString(R.string.pref_default_fiat_currency_value)) ?: context.resources.getString(R.string.pref_default_fiat_currency_value) } ... private fun getCryptocurrencyListFromResponse(fiatCurrencyCode: String, responseList: List<CryptocurrencyLatest>?, timestamp: Engagement?): ArrayList<Cryptocurrency> { val cryptocurrencyList: MutableList<Cryptocurrency> = ArrayList() responseList?.forEach { val cryptocurrency = Cryptocurrency(information technology.id, it.proper name, information technology.cmcRank.toShort(), information technology.symbol, fiatCurrencyCode, it.quote.currency.price, it.quote.currency.percentChange1h, information technology.quote.currency.percentChange7d, it.quote.currency.percentChange24h, timestamp) cryptocurrencyList.add(cryptocurrency) } render cryptocurrencyList every bit ArrayList<Cryptocurrency> } } As you notice in the CryptocurrencyRepository class code, I am using the NetworkBoundResource abstract form. What is it and why exercise we demand it?
NetworkBoundResource is a small simply very of import helper class that will permit the states to maintain a synchronization between the local database and the web service. Our goal is to build a modernistic application that will work smoothly even when our device is offline. Also with the assist of this class we will be able to nowadays different network states similar errors or loading for the user visually.
NetworkBoundResource starts by observing the database for the resource. When the entry is loaded from the database for the first fourth dimension, it checks whether the consequence is good enough to exist dispatched or if it should exist re-fetched from the network. Note that both of these situations can happen at the same fourth dimension, given that y'all probably want to show buried data while updating information technology from the network.
If the network call completes successfully, it saves the response into the database and re-initializes the stream. If the network request fails, the NetworkBoundResource dispatches a failure directly.
/** * A generic class that can provide a resource backed past both the sqlite database and the network. * * * You tin can read more than about it in the [Architecture * Guide](https://programmer.android.com/arch). * @param <ResultType> - Type for the Resources data. * @param <RequestType> - Blazon for the API response. </RequestType></ResultType> */ // It defines two blazon parameters, ResultType and RequestType, // considering the information type returned from the API might non lucifer the information blazon used locally. abstract form NetworkBoundResource<ResultType, RequestType> @MainThread constructor(private val appExecutors: AppExecutors) { // The final result LiveData. private val outcome = MediatorLiveData<Resource<ResultType>>() init { // Ship loading state to UI. outcome.value = Resource.loading(zero) @Suppress("LeakingThis") val dbSource = loadFromDb() result.addSource(dbSource) { data -> effect.removeSource(dbSource) if (shouldFetch(data)) { fetchFromNetwork(dbSource) } else { consequence.addSource(dbSource) { newData -> setValue(Resource.successDb(newData)) } } } } @MainThread private fun setValue(newValue: Resource<ResultType>) { if (event.value != newValue) { result.value = newValue } } // Fetch the data from network and persist into DB and then send it back to UI. private fun fetchFromNetwork(dbSource: LiveData<ResultType>) { val apiResponse = createCall() // We re-attach dbSource every bit a new source, it volition dispatch its latest value rapidly. upshot.addSource(dbSource) { newData -> setValue(Resources.loading(newData)) } // Create inner office equally we want to delay it. fun fetch() { result.addSource(apiResponse) { response -> result.removeSource(apiResponse) result.removeSource(dbSource) when (response) { is ApiSuccessResponse -> { appExecutors.diskIO().execute { saveCallResult(processResponse(response)) appExecutors.mainThread().execute { // We specially request a new live data, // otherwise we will get immediately last cached value, // which may non be updated with latest results received from network. result.addSource(loadFromDb()) { newData -> setValue(Resource.successNetwork(newData)) } } } } is ApiEmptyResponse -> { appExecutors.mainThread().execute { // reload from disk any we had result.addSource(loadFromDb()) { newData -> setValue(Resource.successDb(newData)) } } } is ApiErrorResponse -> { onFetchFailed() upshot.addSource(dbSource) { newData -> setValue(Resource.mistake(response.errorMessage, newData)) } } } } } // Add delay before call if needed. val delay = fetchDelayMillis() if (delay > 0) { Handler().postDelayed({ fetch() }, delay) } else fetch() } // Called when the fetch fails. The child class may want to reset components // like charge per unit limiter. protected open up fun onFetchFailed() {} // Returns a LiveData object that represents the resources that's implemented // in the base of operations form. fun asLiveData() = result as LiveData<Resource<ResultType>> @WorkerThread protected open up fun processResponse(response: ApiSuccessResponse<RequestType>) = response.body // Called to save the consequence of the API response into the database. @WorkerThread protected abstract fun saveCallResult(item: RequestType) // Called with the data in the database to make up one's mind whether to fetch // potentially updated information from the network. @MainThread protected abstract fun shouldFetch(data: ResultType?): Boolean // Make a call to the server after some delay for amend user feel. protected open fun fetchDelayMillis(): Long = 0 // Called to get the cached data from the database. @MainThread protected abstract fun loadFromDb(): LiveData<ResultType> // Called to create the API phone call. @MainThread protected abstract fun createCall(): LiveData<ApiResponse<RequestType>> } Under the hood, the NetworkBoundResource class is fabricated by using MediatorLiveData and its ability to find multiple LiveData sources at in one case. Here we have 2 LiveData sources: the database and the network call response. Both of those LiveData are wrapped into i MediatorLiveData which is exposed by NetworkBoundResource.

Let'south take a closer look how the NetworkBoundResource volition work in our app. Imagine the user volition launch the app and click on a floating action button on the bottom right corner. The app will launch the add together crypto coins screen. Now nosotros tin can analyze NetworkBoundResource's usage inside it.
If the app is freshly installed and it is its first launch, and so in that location will not be any data stored inside the local database. Because at that place is no data to prove, a loading progress bar UI volition be shown. Meanwhile the app is going to brand a asking call to the server via a web service to get all the cryptocurrencies list.
If the response is unsuccessful so the fault message UI will be shown with the power to retry a phone call by pressing a button. When a asking call is successful at last, and then the response data will be saved to a local SQLite database.
If nosotros come back to the same screen the next time, the app will load data from the database instead of making a call to the cyberspace again. Just the user tin can ask for a new information update by implementing pull-to-refresh functionality. Old data information will exist shown whilst the network phone call is happening. All this is done with the aid of NetworkBoundResource.
Another class used in our Repository and LiveDataCallAdapter where all the "magic" happens is ApiResponse. Actually ApiResponse is just a elementary common wrapper around the Retrofit2.Response class that converts each response to an instance of LiveData.
/** * Common course used past API responses. ApiResponse is a simple wrapper around the Retrofit2.Call * class that convert responses to instances of LiveData. * @param <CoinMarketCapType> the type of the response object </T> */ @Suppress("unused") // T is used in extending classes sealed class ApiResponse<CoinMarketCapType> { companion object { fun <CoinMarketCapType> create(mistake: Throwable): ApiErrorResponse<CoinMarketCapType> { return ApiErrorResponse(error.message ?: "Unknown mistake.") } fun <CoinMarketCapType> create(response: Response<CoinMarketCapType>): ApiResponse<CoinMarketCapType> { return if (response.isSuccessful) { val body = response.body() if (body == null || response.code() == 204) { ApiEmptyResponse() } else { ApiSuccessResponse(body = body) } } else { // Convert error response to JSON object. val gson = Gson() val type = object : TypeToken<CoinMarketCap<CoinMarketCapType>>() {}.blazon val errorResponse: CoinMarketCap<CoinMarketCapType> = gson.fromJson(response.errorBody()!!.charStream(), type) val msg = errorResponse.condition?.errorMessage ?: errorResponse.message val errorMsg = if (msg.isNullOrEmpty()) { response.message() } else { msg } ApiErrorResponse(errorMsg ?: "Unknown mistake.") } } } } /** * Split up class for HTTP 204 resposes so that we can make ApiSuccessResponse's body non-null. */ class ApiEmptyResponse<CoinMarketCapType> : ApiResponse<CoinMarketCapType>() information course ApiSuccessResponse<CoinMarketCapType>(val body: CoinMarketCapType) : ApiResponse<CoinMarketCapType>() data class ApiErrorResponse<CoinMarketCapType>(val errorMessage: String) : ApiResponse<CoinMarketCapType>() Inside this wrapper class, if our response has an error, we utilise the Gson library to convert the fault to a JSON object. However, if the response was successful, then the Gson converter for JSON to POJO object mapping is used. We already added it when creating the retrofit architect instance with GsonConverterFactory within the Dagger AppModule role provideApiService.
Glide for prototype loading
What is Glide? From the docs:
Glide is a fast and efficient open source media management and image loading framework for Android that wraps media decoding, memory and disk caching, and resource pooling into a elementary and easy to use interface.
Glide's primary focus is on making scrolling whatever kind of a list of images as smooth and fast as possible, but it is as well effective for about whatsoever case where you lot demand to fetch, resize, and brandish a remote image.
Sounds like a complicated library which offers many useful features that you would non want to develop all by yourself. In My Crypto Coins app, nosotros have several list screens where we demand to show multiple cryptocurrency logos — pictures taken from the net all at once — and still ensure a smooth scrolling feel for the user. Then this library fits our needs perfectly. Also this library is very popular among Android developers.
Steps to setup Glide on My Crypto Coins app project:
Declare dependencies
Get the latest Glide version. Over again versions is a separate file versions.gradle for the project.
// Glide implementation "com.github.bumptech.glide:glide:$versions.glide" kapt "com.github.bumptech.glide:compiler:$versions.glide" // Glide's OkHttp3 integration. implementation "com.github.bumptech.glide:okhttp3-integration:$versions.glide"+"@aar" Considering we want to utilize the networking library OkHttp in our project for all network operations, we need to include the specific Glide integration for it instead of the default one. As well since Glide is going to perform a network request to load images via the internet, we need to include the permission INTERNET in our AndroidManifest.xml file — simply nosotros already did that with the Retrofit setup.
Create AppGlideModule
Glide v4, which we will be using, offers a generated API for Applications. Information technology volition use an notation processor to generate an API that allows applications to extend Glide's API and include components provided by integration libraries. For any app to access the generated Glide API we need to include an accordingly annotated AppGlideModule implementation. There tin be only a single implementation of the generated API and only i AppGlideModule per awarding.
Let'due south create a class extending AppGlideModule somewhere in your app project:
/** * Glide v4 uses an annotation processor to generate an API that allows applications to admission all * options in RequestBuilder, RequestOptions and any included integration libraries in a single * fluent API. * * The generated API serves 2 purposes: * Integration libraries tin can extend Glide's API with custom options. * Applications tin extend Glide'southward API by adding methods that bundle normally used options. * * Although both of these tasks tin exist accomplished past hand by writing custom subclasses of * RequestOptions, doing then is challenging and produces a less fluent API. */ @GlideModule class AppGlideModule : AppGlideModule() Fifty-fifty if our application is non changing any additional settings or implementing any methods in AppGlideModule, we still need to take its implementation to employ Glide. You're not required to implement whatsoever of the methods in AppGlideModule for the API to be generated. Y'all tin can leave the form blank as long equally it extends AppGlideModule and is annotated with @GlideModule.
Apply Glide-generated API
When using AppGlideModule, applications tin employ the API by starting all loads with GlideApp.with(). This is the code that shows how I have used Glide to load and show cryptocurrency logos in the add crypto coins screen all cryptocurrencies list.
form AddSearchListAdapter(val context: Context, individual val cryptocurrencyClickCallback: ((Cryptocurrency) -> Unit)?) : BaseAdapter() { ... override fun getView(position: Int, convertView: View?, parent: ViewGroup?): View { ... val itemBinding: ActivityAddSearchListItemBinding ... // Nosotros make an Uri of image that nosotros need to load. Every paradigm unique name is its id. val imageUri = Uri.parse(CRYPTOCURRENCY_IMAGE_URL).buildUpon() .appendPath(CRYPTOCURRENCY_IMAGE_SIZE_PX) .appendPath(cryptocurrency.id.toString() + CRYPTOCURRENCY_IMAGE_FILE) .build() // Glide generated API from AppGlideModule. GlideApp // We need to provide context to make a call. .with(itemBinding.root) // Hither y'all specify which epitome should be loaded by providing Uri. .load(imageUri) // The mode you combine and execute multiple transformations. // WhiteBackground is our own implemented custom transformation. // CircleCrop is default transformation that Glide ships with. .transform(MultiTransformation(WhiteBackground(), CircleCrop())) // The target ImageView your epitome is supposed to get displayed in. .into(itemBinding.itemImageIcon.imageview_front) ... return itemBinding.root } ... } As you run into, you tin first using Glide with just few lines of code and let information technology practise all the difficult work for you. It is pretty straightforward.
Kotlin Coroutines
While building this app, we are going to face situations when we volition run time consuming tasks such as writing data to a database or reading from it, fetching information from the network and other. All these mutual tasks take longer to consummate than allowed past the Android framework's main thread.
The principal thread is a single thread that handles all updates to the UI. Developers are required non to block it to avoid the app freezing or fifty-fifty crashing with an Application Not Responding dialog. Kotlin coroutines is going to solve this problem for us past introducing main thread safe. It is the concluding missing piece that we desire to add together for My Crypto Coins app.
Coroutines are a Kotlin feature that convert async callbacks for long-running tasks, such every bit database or network access, into sequential code. With coroutines, you can write asynchronous code, which was traditionally written using the Callback pattern, using a synchronous style. The return value of a function volition provide the result of the asynchronous telephone call. Code written sequentially is typically easier to read, and tin can even use linguistic communication features such as exceptions.
So we are going to use coroutines everywhere in this app where we demand to wait until a effect is available from a long-running task and than go along execution. Let's come across i exact implementation for our ViewModel where we will retry getting the latest information from the server for our cryptocurrencies presented on the master screen.
First add coroutines to the projection:
// Coroutines support libraries for Kotlin. // Dependencies for coroutines. implementation "org.jetbrains.kotlinx:kotlinx-coroutines-core:$versions.coroutines" // Dependency is for the special UI context that can be passed to coroutine builders that utilise // the primary thread dispatcher to acceleration events on the main thread. implementation "org.jetbrains.kotlinx:kotlinx-coroutines-android:$versions.coroutines" Then we volition create abstract class which will get the base course to exist used for any ViewModel that needs to take common functionality like coroutines in our case:
abstract class BaseViewModel : ViewModel() { // In Kotlin, all coroutines run within a CoroutineScope. // A telescopic controls the lifetime of coroutines through its job. private val viewModelJob = Chore() // Since uiScope has a default dispatcher of Dispatchers.Main, this coroutine will be launched // in the principal thread. val uiScope = CoroutineScope(Dispatchers.Chief + viewModelJob) // onCleared is called when the ViewModel is no longer used and will be destroyed. // This typically happens when the user navigates abroad from the Action or Fragment that was // using the ViewModel. override fun onCleared() { super.onCleared() // When you cancel the chore of a scope, information technology cancels all coroutines started in that scope. // It's important to cancel whatsoever coroutines that are no longer required to avert unnecessary // work and memory leaks. viewModelJob.cancel() } } Here we create specific coroutine scope, which will control the lifetime of coroutines through its task. As you see, scope allows you to specify a default dispatcher that controls which thread runs a coroutine. When the ViewModel is no longer used, we cancel viewModelJob and with that every coroutine started by uiScope volition be cancelled as well.
Finally, implement the retry functionality:
/** * The ViewModel class is designed to store and manage UI-related data in a lifecycle witting mode. * The ViewModel class allows data to survive configuration changes such as screen rotations. */ // ViewModel will crave a CryptocurrencyRepository and so we add @Inject code into ViewModel constructor. class MainViewModel @Inject constructor(val context: Context, val cryptocurrencyRepository: CryptocurrencyRepository) : BaseViewModel() { ... val mediatorLiveDataMyCryptocurrencyResourceList = MediatorLiveData<Resource<List<MyCryptocurrency>>>() private var liveDataMyCryptocurrencyResourceList: LiveData<Resource<List<MyCryptocurrency>>> private val liveDataMyCryptocurrencyList: LiveData<Listing<MyCryptocurrency>> ... // This is additional helper variable to bargain correctly with currency spinner and preference. // Information technology is kept inside viewmodel not to be lost because of fragment/activity recreation. var newSelectedFiatCurrencyCode: String? = nil // Helper variable to store state of swipe refresh layout. var isSwipeRefreshing: Boolean = imitation init { ... // Ready a resource value for a listing of cryptocurrencies that user owns. liveDataMyCryptocurrencyResourceList = cryptocurrencyRepository.getMyCryptocurrencyLiveDataResourceList(cryptocurrencyRepository.getCurrentFiatCurrencyCode()) // Declare additional variable to be able to reload information on demand. mediatorLiveDataMyCryptocurrencyResourceList.addSource(liveDataMyCryptocurrencyResourceList) { mediatorLiveDataMyCryptocurrencyResourceList.value = information technology } ... } ... /** * On retry we need to run sequential lawmaking. Starting time we need to get owned crypto coins ids from * local database, wait for response and only after it employ these ids to make a phone call with * retrofit to get updated owned crypto values. This can be done using Kotlin Coroutines. */ fun retry(newFiatCurrencyCode: String? = null) { // Here we shop new selected currency equally additional variable or reset it. // Later on if call to server is unsuccessful we will reuse it for retry functionality. newSelectedFiatCurrencyCode = newFiatCurrencyCode // Launch a coroutine in uiScope. uiScope.launch { // Make a call to the server after some delay for better user experience. updateMyCryptocurrencyList(newFiatCurrencyCode, SERVER_CALL_DELAY_MILLISECONDS) } } // Refresh the information from local database. fun refreshMyCryptocurrencyResourceList() { refreshMyCryptocurrencyResourceList(cryptocurrencyRepository.getMyCryptocurrencyLiveDataResourceList(cryptocurrencyRepository.getCurrentFiatCurrencyCode())) } // To implement a transmission refresh without modifying your existing LiveData logic. private fun refreshMyCryptocurrencyResourceList(liveData: LiveData<Resources<Listing<MyCryptocurrency>>>) { mediatorLiveDataMyCryptocurrencyResourceList.removeSource(liveDataMyCryptocurrencyResourceList) liveDataMyCryptocurrencyResourceList = liveData mediatorLiveDataMyCryptocurrencyResourceList.addSource(liveDataMyCryptocurrencyResourceList) { mediatorLiveDataMyCryptocurrencyResourceList.value = it } } individual suspend fun updateMyCryptocurrencyList(newFiatCurrencyCode: String? = null, callDelay: Long = 0) { val fiatCurrencyCode: String = newFiatCurrencyCode ?: cryptocurrencyRepository.getCurrentFiatCurrencyCode() isSwipeRefreshing = true // The role withContext is a suspend function. The withContext immediately shifts // execution of the block into unlike thread inside the block, and dorsum when it // completes. IO dispatcher is suitable for execution the network requests in IO thread. val myCryptocurrencyIds = withContext(Dispatchers.IO) { // Suspend until getMyCryptocurrencyIds() returns a event. cryptocurrencyRepository.getMyCryptocurrencyIds() } // Hither we come back to principal worker thread. As shortly as myCryptocurrencyIds has a consequence // and main looper is available, coroutine resumes on main thread, and // [getMyCryptocurrencyLiveDataResourceList] is chosen. // We wait for groundwork operations to consummate, without blocking the original thread. refreshMyCryptocurrencyResourceList( cryptocurrencyRepository.getMyCryptocurrencyLiveDataResourceList (fiatCurrencyCode, true, myCryptocurrencyIds, callDelay)) } ... } Hither we telephone call a part marked with a special Kotlin keyword suspend for coroutines. This ways that the office suspends execution until the result is ready, and so information technology resumes where it left off with the issue. While it is suspended waiting for a result, information technology unblocks the thread that information technology is running on.
Besides, in ane append function we tin can call some other suspend function. Every bit you encounter nosotros exercise that by calling new suspend function marked withContext that is executed on different thread.
The idea of all this lawmaking is that we tin combine multiple calls to form nice-looking sequential code. Showtime we request to become the ids of the cryptocurrencies we own from the local database and wait for the response. Only after we get it practice we use the response ids to make a new telephone call with Retrofit to go those updated cryptocurrency values. That is our retry functionality.
We made information technology! Terminal thoughts, repository, app & presentation
Congratulations, I am happy if you managed to reach to the end. All the most significant points for creating this app have been covered. There was plenty of new stuff done in this part and a lot of that is not covered by this article, but I commented my code everywhere very well so you should non get lost in it. Check out final code for this function v here on GitHub:
View Source On GitHub.
The biggest claiming for me personally was not to learn new technologies, not to develop the app, but to write all these articles. Actually I am very happy with myself that I completed this challenge. Learning and developing is easy compared to didactics others, but that is where you can understand the topic even meliorate. My advice if you are looking for the all-time way to learn new things is to start creating something yourself immediately. I promise you will learn a lot and quickly.
All these articles are based on version 1.0.0 of "Kriptofolio" (previously "My Crypto Coins") app which you can download as a separate APK file here. But I will be very happy if you install and rate the latest app version from the store directly:
Go Information technology On Google Play
Also delight experience gratuitous to visit this unproblematic presentation website that I made for this project:
Kriptofolio.app

Ačiū! Thanks for reading! I originally published this post for my personal blog www.baruckis.com on May eleven, 2019.
Learn to code for free. freeCodeCamp's open up source curriculum has helped more 40,000 people get jobs as developers. Get started
Source: https://www.freecodecamp.org/news/kriptofolio-app-series-part-5/
0 Response to "Android Retrofit Call Again on Failed"
Postar um comentário