Easy Girls Sleeveless Nightgown Patterns for Beginners

Learn how to sew a nightgown, using my free girls nightgown pattern. The pattern is available in sizes 3 to 16.

Summer Nightgown Pattern
I'm still catching up on all of the sewing I did before our end of the summer trip. We'd left the kids with their cousins for a few extra days and I thought my lil' missy would like to have a new nightgown for her trip.

Free Girls Nightgown Patterns:
This girls nightgown pattern is based on my tank top pattern, so if you've made that one, you can make your missy a summer nightgown with no problem!
I also have a great Princess Nightgown Tutorial (called princess due to the fancy sleeves.) That nightgown can be made with any fabric since it is based on my peasant dress pattern. (Which makes and excellent long sleeve flannel nightgown, btw.)

I've just about run out of ideas for altering my tank pattern, although I do have one more project planned before putting it away- I'm going to create a sleeve for all the sizes and add it to the pattern. But first, I'm making another one of these dresses and some shorties with this pattern. (See my free t-shirt pattern long and short sleeves here.)

Easy Nightgown Pattern Designed for Knits
When I first created this girls nightgown pattern and tutorial, it only went up to a size 8. I've now extended the sizes to go up to size 16. The free nightgown pattern is designed to use with stretch knit fabric and should hit at about the knee.
What makes this pattern so easy is that it is just a couple of pattern pieces (front, back, optional ruffle and binding strips) and it can be cut out and assembled in just a couple of hours.

A few tips for sewing with knits:
New to sewing with knits? I recommend starting with a few easy up-cycled projects using old t-shirts. And when you are ready, There are so many cute fabrics and projects to sew! (I have over 100 projects and patterns made with knit fabric here.)
- Always use a ball point or jersey/stretch needle. A ball point needle has a rounded tip and allows the needle to move in between the thread fibers instead of piercing the thread fibers. (Which will cause holes in the fabric.)
- When sewing seams that need to stretch, be sure to use either a narrow zig zag stitch- set at a medium stitch length, or many newer machines have additional stretch stitches you can use. (Refer to your manual to find out which ones your machine does.)
- It helps to loosen the needle thread tension just a tiny bit. (experiment on scraps til you find what works best on your fabric.)
- For seams that don't need to stretch (like side seams) a regular straight stitch set to a slightly longer stitch length and loosening the needle thread tension just a tiny bit should be ok. ALWAYS do a few practice stitches on the fabric you will be using and then make any adjustments needed.
- If you are working on a fabric that keeps curling, use fabric starch and your iron to flatten out the fabric. This technique is helpful on all knits as the starch makes it less stretchy and moves through the machine smoother.
- For hemming on knits, you have a few choices:1. Leave the edge raw. This looks fine on casual garments.2. Add a bound edge. (You can see examples of how adding a bound hem works here and here.)3. Use awalking foot and hem the edge with either a zig zag or other stretch stitchor using a twin needle. (The walking foot helps feed the material through the machine with less stretching.)
- You can also try using this wash away hem tape. It's .25 inches wide and you iron it to the bottom of you hem, fold it up and sew right over it. Make a nice stable, non-ripply, but still stretchy hem.
- Remember to try a slightly longer stitch length and to loosen the needle thread tension just a tiny bit!
- If your fabric is getting sucked into the machine or is still stretching, you can place a piece of thin tissue paper between the fabric and bottom feed dogs. After you are done sewing, you can gently tear the tissue paper away.
Ready to learn how to sew a nightgown?
Knit Nightgown Pattern and Tutorial (sz 3 to 16)
Save the sewing instructions by pinning here ==>> ![]()
Most Important Tips for sewing with knits on this project:
- Use a ballpoint/stretch needle
- Sew seams with either a serger, stretch stitch, narrow zig zag or a straight stitch with a longer stitch length and a slightly loosened tension. (Make a couple of practice stitches on your fabric to see what works best.) I also like to use this "lightning bolt" stretch stitch on seams that need strength but a little give. (For my project I used a combination of straight stitch and serger for seams and zig zag on the hems.)
- Use spray starch when pressing hems. Sew hems with a zig zag, twin ball point needle, narrow zig zag with a long stitch length or a straight stitch with a long stitch length and a slightly loosened tension or leave raw. (also helps to use a walking foot.)
- If you find your fabric keeps getting pulled inside the needle plate, place a small piece of tissue underneath the fabric so the feed dogs have something to grip.
Binding tips:
- The pattern for the neck binding is designed for a ribbed knit with a minimum of 75% stretch with good recovery (Fabric Fairy has a lot of good quality ribbed knit choices.) If using a binding fabric with less stretch, Measure the neckline and cut a fabric strip 10% less than the measurement (multiply the neck measurement by .9)
Pattern info:
- To get the pattern, you must navigate to the nightgown pattern page in my shop. Enter your name and email and check out (it's free.) The pattern will be emailed to you. Click the download link and the pattern automatically downloads.. Save it to your PC. Open The free Adobe reader and then open the pattern file. (Don't print from directly from google's online version of adobe reader. It will sometimes cause the pattern to print to small or it just won't open.)
- All measurements are in inches.
- Seam allowance is 1/4 inch with a 1/2 inch bottom.
Nightgown Fit Chart:

Materials need to make this nightgown pattern:
- Stretchy knit fabric, 60 inches wide (1 yard for the largest size) or an old stretchy t-shirt, rib knits work great.
- Ribbed knit for binding
- Pattern
- ball point/stretch needle
- iron
- basic sewing supplies
optional:
- walking foot
- double needle
- Wash away hem tape
Products used and recommended in this post:
- My Sewing Machine: SINGER 9960 Quantum Stylist (600-Stitch Machine with Extension Table, Bonus Accessories and Hard Cover)
- My Serger: Brother 1034D 3 or 4 Thread Serger or you can just use Pinking Shears
- Rotary Cutter
- I love my large ruler and large cutting mat, but you may prefer to start of with a smaller Cutting set
- Dritz Dual Purpose Marking Pen and Fray Check
- Wonder clips (I didn't use these in the post, but they are just awesome!
- Ball Point/stretch needles
- Ball point/stretch double needle
- Singer walking foot or universal walking foot
- Knit fabric suppliers: Funkalicous Fabrics and Fabric.com
Nightgown Sewing Instructions:
(Seam allowances are 1/4 inch unless otherwise specified.)
Step 1: Printing and assembling the pattern.

Once you have downloaded the pattern to your desktop and opened it in the free adobe reader program, there's a new printing option for you. You can now print only the size needed. (this pattern only, I'll slowly go back and start updating the older patterns.) This function is super handy and makes it much less confusing when cutting the pattern, plus I love that it enables me to print in black and white. (that color ink can be pricey!)
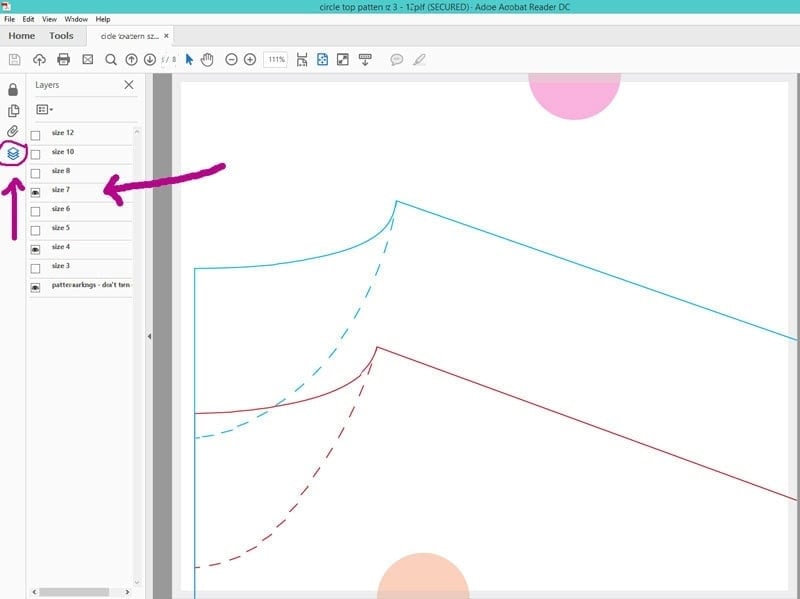
Step 2: Cut out pattern pieces.
Bodice:
Fold the fabric so the selvages meet in the middle, with the stretchy-ness running from side to side. Line up the bodice pattern pieces on the fold and cut one front and one back.

Binding:
Cut out 1 neck binding (on fold) and 2 arm binding (on fold). Ribbed knit works great as binding.

(If you are concerned that your binding fabric is not stretch enough, you can cut it an inch or two longer and just trim off the excess later.
Ruffle Strips:
I did not include printable pattern pieces for the ruffle strips. They are just rectangles and this will save you on paper and printer ink.
Cut a ruffle strip that corresponds to your size in the chart below. Keep in mind, If you are using a narrow fabric, you might have to sew 2 pieces together.
3: 4 by 47 inches
4: 4 by 49 inches
5: 4 by 50.25 inches
6: 4.25 by 51.75 inches
7: 4.25 by 53.25 inches
8: 4.25 by 55 inches
10: 4.25 by 61 inches
12: 4.25 by 62.75 inches
14: 4.25 by 64.75 inches
16: 4.25 by 66.5 inches
Step 3: Assembling the top and attaching the binding.
Lie up the front and back pieces right sides together and sew along ONE shoulders seam, using a 1/4 inch seam allowance.

Line up the front and back necklines with each other to find the center point and mark it with a pin. (Remember the front neckline is longer/deeper, so the center point will not be the shoulder seam.)

Find the center point of the neck binding and mark it. Line up the edge of the binding with the edge of the tank neckline, right sides together. Pining them in place at the center marks.

You can use a stretch stitch to attach the binding to the tank. (The stitch I used looks like this, but a very narrow zig zag would work too.) I have also just used a straight stitch, lengthened to 3.

My sewing machine kept pulling the fabric into the machine at the first few stitches, so I placed a piece of tissue under the fabric to help get it started.
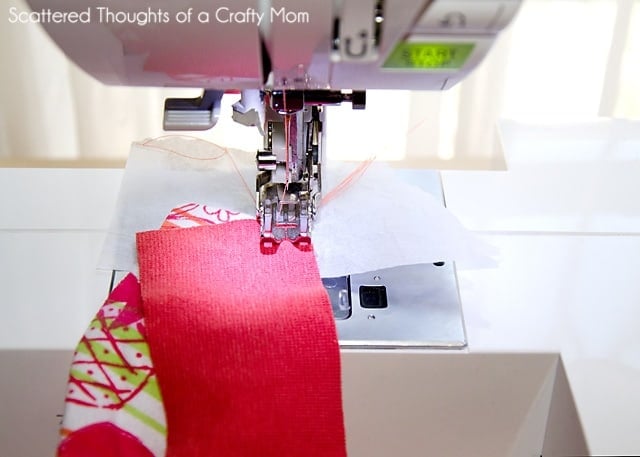
Sew the binding to the tank, stretching the binding as you go. (1/4th inch from the edge.)

Flip the fabric over and press. Make sure to press the seams toward the top of the top.

(my original photos didn't show the next step very well, so I recreated it for you on scraps…)
Flip the binding over the the wrong side of the fabric enclosing the seam and pin in place. Be sure to put the pins on the right side of the top. I tried not using pins, but it definitely makes a neater finish if you take the time to use pins. (I have also experimented with using wash away wonder tape instead of pins, and it works great too.)


Using a wide, long zig zag, stitch the binding in place. You will want to sew on the front side so you can see what you are doing. Remove the pins before they reach the sewing machine foot. (You could also try using a double needle here.)

Flip the top over and carefully trim the excess binding.


Line up the other shoulder seam and sew together.

Repeat the binding process for the two arm holes.
Step 4: Sewing the side seam.
Line up the side seams and sew 1 side seam only. (I usually use a straight stitch lengthened to 3. Finish this seam with your favorite seam finishing method if desired. Keep in mind, knits don't fray, so finishing is just a matter of preference.) I love my Brother 1034d serger for sewing seams. It is usually under $200 on Amazon and I highly recommend it for taking your garment sewing to the next level. (Also, I give one away every year around Christmas time, so watch for that!)

Step 5: Adding the Ruffle.
Do you plan to hem your ruffle? You don't have to as knit doesn't fray. The ruffle measurement does include a 1/2 inch hem allowance. If you don't hem your ruffle, you can cut off that extra half inch if desired.
To hem the ruffle, fold up .25 inches and press, fold up another .25 inch and press again. Hem using a zig zag or double needle. Use lots of spray starch to help stabilize the hem or the wash away hem tape works good for this too.
Sew a basting stitch along the top of your ruffle strip. (A basting stitch is a long straight stitch <usually a stitch length of 5 or 6 on your machine> designed to be removed.)
Open your nightgown so it lays flat on your workspace. Pull on the bobbin thread of you basting stitch to gather your ruffle to the same width as the bottom of the nightgown.

Line up the raw edge of of the ruffle with the raw edge of the nightgown, right sides together. Pin in place.

Sew the ruffle in place with a straight stitch, right along the basting stitch. Remove the pins as you sew.

Flip the ruffle over and press the seam up. Remove any visible basting stitch. Top stitch along the top of the ruffle if desired.
Sew the last side seam together, finishing the seam if desired. Flip nightgown right side out and press the side seams.
Trim/tie off all threads, adding a bit of fray check if needed.
You are done – have you little missy model her new summer nightgown!

(And yes, we STILL have this blankie I made several years ago. I even once had someone on a plane stop and ask me if I made the blankie! (She had the same minky fleece fabric.)
Don't forget, if you end up making one of these nightgowns, be sure to come back and share your photos on my facebook page or tag me on Instagram, using #scatteredmompatterns.
Don't miss any more posts!

Follow along on:
Feedly , Bloglovin ', your favorite feed reader, or signing up via email and have new posts delivered to your email box each week!
Prep Time 15 minutes
Active Time 2 hours
Additional Time 5 minutes
Total Time 2 hours 20 minutes
Difficulty easy/intermediate
Materials
- knit fabric
- Ribbed binding
Tools
- basic sewing supplies
Instructions
Nightgown Sewing Instructions:
(Seam allowances are 1/4 inch unless otherwise specified.)
- Printing and assembling the pattern.
Once you have downloaded the pattern to your desktop and opened it in the free adobe reader program, there's a new printing option for you. You can now print only the size needed. (this pattern only, I'll slowly go back and start updating the older patterns.) This function is super handy and makes it much less confusing when cutting the pattern, plus I love that it enables me to print in black and white. (that color ink can be pricey!) - Cut out pattern pieces.
Bodice:
Fold the fabric so the selvages meet in the middle, with the stretchy-ness running from side to side. Line up the bodice pattern pieces on the fold and cut one front and one back.
how to sew a nightgown
Binding:
Cut out 1 neck binding (on fold) and 2 arm binding (on fold). Ribbed knit works great as binding.
(If you are concerned that your binding fabric is not stretch enough, you can cut it an inch or two longer and just trim off the excess later.
Ruffle Strips:
I did not include printable pattern pieces for the ruffle strips. They are just rectangles and this will save you on paper and printer ink.
Cut a ruffle strip that corresponds to your size in the chart below. Keep in mind, If you are using a narrow fabric, you might have to sew 2 pieces together.
3: 4 by 47 inches
4: 4 by 49 inches
5: 4 by 50.25 inches
6: 4.25 by 51.75 inches
7: 4.25 by 53.25 inches
8: 4.25 by 55 inches
10: 4.25 by 61 inches
12: 4.25 by 62.75 inches
14: 4.25 by 64.75 inches
16: 4.25 by 66.5 inches - Assembling the top and attaching the binding.
Line up the front and back pieces right sides together and sew along ONE shoulders seam, using a 1/4 inch seam allowance.Line up the front and back necklines with each other to find the center point and mark it with a pin. (Remember the front neckline is longer/deeper, so the center point will not be the shoulder seam.)
Find the center point of the neck binding and mark it. Line up the edge of the binding with the edge of the tank neckline, right sides together. Pining them in place at the center marks.
You can use a stretch stitch to attach the binding to the tank. (The stitch I used looks like this, but a very narrow zig zag would work too.) I have also just used a straight stitch, lengthened to 3.
Sew the binding to the tank, stretching the binding as you go. (1/4th inch from the edge.)
Flip the fabric over and press. Make sure to press the seams toward the top of the top.
Flip the binding over the the wrong side of the fabric enclosing the seam and pin in place. Be sure to put the pins on the right side of the top. I tried not using pins, but it definitely makes a neater finish if you take the time to use pins. (I have also experimented with using wash away wonder tape instead of pins, and it works great too.)
Using a wide, long zig zag, stitch the binding in place. You will want to sew on the front side so you can see what you are doing. Remove the pins before they reach the sewing machine foot. (You could also try using a double needle here.)
Flip the top over and carefully trim the excess binding.
Line up the other shoulder seam and sew together.
Repeat the binding process for the two arm holes.
- Sewing the side seam.
Line up the side seams and sew 1 side seam only. (I usually use a straight stitch lengthened to 3.Finish this seam with your favorite seam finishing method if desired. Keep in mind, knits don't fray, so finishing is just a matter of preference.)
I love my Brother 1034d serger for sewing seams. It is usually under $200 on Amazon and I highly recommend it for taking your garment sewing to the next level. (Also, I give one away every year around Christmas time, so watch for that!)
- Adding the Ruffle.
Do you plan to hem your ruffle? You don't have to as knit doesn't fray. The ruffle measurement does include a 1/2 inch hem allowance. If you don't hem your ruffle, you can cut off that extra half inch if desired.To hem the ruffle, fold up .25 inches and press, fold up another .25 inch and press again. Hem using a zig zag or double needle. Use lots of spray starch to help stabilize the hem or the wash away hem tape works good for this too.
Sew a basting stitch along the top of your ruffle strip. (A basting stitch is a long straight stitch designed to be removed.)
Open your nightgown so it lays flat on your workspace. Pull on the bobbin thread of you basting stitch to gather your ruffle to the same width as the bottom of the nightgown.
Line up the raw edge of of the ruffle with the raw edge of the nightgown, right sides together. Pin in place.Sew the ruffle in place with a straight stitch, right along the basting stitch. Remove the pins as you sew.
- Finishing the nightgown:
Flip the ruffle over and press the seam up. Remove any visible basting stitch. Top stitch along the top of the ruffle if desired.
Sew the last side seam together, finishing the seam if desired. Flip nightgown right side out and press the side seams.
Trim/tie aff all threads, adding a bit of fray check if needed.
You are done.
Source: https://www.scatteredthoughtsofacraftymom.com/night-gown-tutorial-free-pattern/
0 Response to "Easy Girls Sleeveless Nightgown Patterns for Beginners"
Postar um comentário